Migrating a T3 app into a Turborepo
For a while now, we've been getting a lot of requests for including a CLI option to scaffold create-t3-app into a monorepo so that you can share code between your web and mobile application.
We have turn these requests down due to the added complexity it would bring, and the fact that we do not want to prescribe how to run your monorepo. There are several tooling available for monorepos, including Lerna and NX. Then there's the new kid on the block, turborepo which we recently migrated the create-t3-app repo into so that we could have our upcoming documentation site in the same repo as the CLI scaffolding tool.
But... I won't let y'all down entirely, so I decided to create a template repo that should help you setup a T3 monorepo. Presenting create-t3-turbo. I'll admit the name might be deceiving since it isn't a scaffolding tool like create-t3-app is, but instead just a template repo with all the pieces included without any options to pick and choose.
Apologies in advance, this post is going to be a bit long, so for everyone who just want to see the final result, you can browse the repo directly here. TL;DR, we are going to take an existing T3 app and split it into a monorepo using turborepo. After that, we'll add an Expo app to the monorepo and consume the tRPC API on both web and mobile. I'll break this process down into smaller pieces and commit accordingly, so that you can follow along as easy as possible.
Due to the fact that next-auth currently doesn't support react-native, and
I do not want to prescribe a way to solve this problem, I'll leave auth out
entirely for this demo.
This post has been updated since the original and thus there may be differences between the project snapshots linked, and the result of the steps described in this post.
Initializing your T3 App
For demonstration purposes, I'll start by creating a new T3 app, but you can of course
use your existing one. Since we're going to be turning this into a monorepo, I'll
also showcase the ability to enter a scoped appname when using the CLI. I'll assume
you are already in a git repository and I'll hold off on installing the dependencies
until we have setup turborepo. Lastly, if you haven't already tried out the next
version of the CLI, try it out - it is... Blazingly Fast™.
npm create t3-app@latest apps/@acme/nextjs --noGit --noInstallI'll select all packages except for next-auth.
(2022-12-03): There is now an auth package in the final repository that showcases how you'd code split that to work with the rest of the pieces. This uses Next-Auth.js which unfortunately doesn't support Expo, but the code split can most likely be used with other auth providers too.
At this point, you'll have a new T3 app in apps/nextjs, and if you check the package.json,
you'll see that it got named @acme/nextjs. If you are using an existing app, just
move it into the apps/ sub-directory and scope-name it to something appropriate.
Also clean out any temporary files, as well as your lockfile, we'll get all of those
re-setup when we initialize turbo.
Your repo should look something like this now.
Initializing turbo
Now we'll install turbo and create some basic configuration files for it. Add the following configuration files into your project root, these are basic configuration files inspired by the turbo example apps:
Next, move the .gitignore from your T3 app into the project root, and add .turbo, .expo and dist to its ignored files. We'll also need a base tsconfig that we'll later inherit from. We'll use the tsconfig.json from the T3 app as base, and then inherit from this file in the T3 app:
Now, install all the dependencies using your preffered package manager:
npm installYour repo should look something like this now.
Extracting your prisma database client to it's own package
Let's start restructing this monorepo. We'll start off with extracting the prisma client to it's own package. This way, it is more reusable when you add more things which consumes it later.
We'll start off by creating a new package, @acme/db in packages/db with some basic configuration files:
We'll move the client as well as the prisma models from the T3 App, you might also need to remove the global declaration.
mv apps/nextjs/src/server/db/client.ts packages/db/index.ts
mv apps/nextjs/prisma packages/db/prisma
You can now delete the prisma and @prisma/client dependencies in the T3 app, as well as the postinstall script.
We won't do type validation for environment variables in this subpackage, so
remove the env import and use process.env instead.
Your repo should now look something like this.
Extracting your tRPC router to its own package
Next, we'll do a similar thing with our tRPC router and extract that out from the T3 app into its own package. This makes it so that we can share it between our different apps.
We'll initialize a new package, @acme/api in packages/api with some basic configuration files:
Next, we'll move the tRPC router from the T3 app into this package:
mv apps/nextjs/src/server/trpc packages/api/srcWe'll create a few barrel-files in the api package to make importing easier:
export type { AppRouter } from "./src/router";
export { appRouter } from "./src/router";

export { createContext } from "./src/context";
export type { Context } from "./src/context";
There are a few small bits that we need to modify now. First, we'll resolve some imports:
import { prisma } from "@acme/db";import type { AppRouter } from "@acme/api";
import superjson from "superjson";
// <-- use this in `initTRPC`import { appRouter, createContext } from "@acme/api";Then, we'll add the @acme/api package as a dependency for the T3 App. Since Next.js 13, they support transpiling packages natively which I'll be using. Transpile the @acme/api package in your next.config.mjs like this:
const config = {
  transpilePackages: ["@acme/api"],
};
When you're done, your repo should look something like this.
Now you should be able to launch the application again. Run a install then start the dev-server.
If you don't want a mobile application, you can stop right here and call it a day. You have successfully separated your Next.js application from its tRPC router and Prisma client. However, one of the main arguments for splitting it up like this is so that you can consume the API in other applications so we'll do that next.
Adding an Expo React Native application to the mix
Bootstrap the Expo application by running the following command:
npx create-expo-app apps/expo --template blank-typescriptYou should be left with a React Native application using Typescript, React 18 with Expo SDK 48. Because we are using it in a monorepo, there are a few things we need to do in order to get it working.
In the package.json, change the main entrypoint, I'll also scope the package name to get it coherant with the rest of the repo as well as adding a dev script so that it launches in my preferred way along with the others:
{
  "name": "@acme/expo",
  "main": "src/_app.tsx",
  "scripts": {
    "dev": "expo start --ios", // depending on your use-case
    ...
  }
  ...
}
Now we need to create this entrypoint, move the App.tsx to src/_app.tsx and add the following content:
import { registerRootComponent } from "expo";

const App = () => {
  ...
};

registerRootComponent(App);
You might have noticed earlier, that the dependency installation failed while creating the Expo app, so we'll run that manually from the project root.
npm installI'll also add some nice-to-haves, although they are completely optional:
npm install @shopify/flash-list react-native-safe-area-context -w apps/expoExpo might also have initialized its own Git repository, in that case we'll have to remove that:
rm -rf apps/expo/.gitAs of writing this post, React Native only supports React 18.0.0. Make sure to match the versions in your Next.js application, or you'll get some errors when starting up. Clean the dependencies and remove the lockfile, and re-install once you have.
(2022-12-24): Since the Next.js app is now using Next13 which requires React
18.2, you'll most likely want to match the Expo app to the same version. It
will throw some warnings in the console but it should work for most cases. If
it doesn't for you - lock it to 18.1 awaiting Expo SDK 48.
You should now be able to start the application. Running
npm run devshould start up Prisma Studio, Next.js and Expo. Make some changes to the App's content and you should see it refresh on the phone. We'll now move on to adding the other awesome T3 tech to this mobile application.
Your repo should now look something like this
Adding Tailwind
To add styling using TailwindCSS to your Expo application, we'll be using a package called Nativewind. It will allow us to style our React Native elements just like we would with any of the HTML DOM elements using the className attribute.
First, install the dependencies to the Expo project:
npm install nativewind -w apps/expo
npm install -D tailwindcss -w apps/expo
Copy over your tailwind config from the Next.js application. Alternatively you can abstract it into a separate config package and extend from that one.
cp apps/nextjs/tailwind.config.cjs apps/expo/tailwind.config.cjsThen, in order to use tailwind directly on the elements without needing to wrap them in styled(), we'll use their Babel plugin. In your babel.config.js, add the following field:
plugins: ["nativewind/babel"],We'll also need to include the types to support the className keyword without getting a bunch of type-errors. Create a types/nativewind.d.ts file and add the following tripple-slash directive to it:
/// <reference types="nativewind/types" />Now you're done and can use Tailwind classes just like normal. You'll even have the awesome Intellisense if you have the VSCode plugin installed.
At this point, your repo should look something like this.
Consuming your tRPC API in Expo
Now, we'd want to call our tRPC API in our Expo application. We'll start by adding the necessary dependencies to the app:
npm install @trpc/client @trpc/server @trpc/react @tanstack/react-query -w apps/expo
npm install -D @acme/api
Note that @acme/api is a devDependency, meaning no backend code will leak
into the client bundle - whilst retaining the full-stack typesafety and DX of
tRPC.
Setup the trpc object in src/utils/trpc.ts:
import type { AppRouter } from "@acme/api";
import { createTRPCReact } from "@trpc/react-query";

export const trpc = createTRPCReact<AppRouter>();
Next, we'll configure the trpcClient and queryClient in the _app.tsx:
import React from "react";
import { QueryClient, QueryClientProvider } from "@tanstack/react-query";
import superjson from "superjson";

import { trpc } from "./utils/trpc";

const url = "http://localhost:3000/api/trpc";

const App = () => {
  const [queryClient] = React.useState(() => new QueryClient());
  const [trpcClient] = React.useState(() =>
    trpc.createClient({ url, transformer: superjson }),
  );

  return (
    <trpc.Provider client={trpcClient} queryClient={queryClient}>
      <QueryClientProvider client={queryClient}>...</QueryClientProvider>
    </trpc.Provider>
  );
};
As a bonus, I'll refactor the screen's content out to src/screens/Home.tsx. You should be left with something like this:
import React from "react";
import { QueryClient, QueryClientProvider } from "@tanstack/react-query";
import { registerRootComponent } from "expo";
import { StatusBar } from "expo-status-bar";
import { SafeAreaProvider } from "react-native-safe-area-context";
import superjson from "superjson";

import { HomeScreen } from "./screens/home";
import { trpc } from "./utils/trpc";

const url = "http://localhost:3000/api/trpc";

const App = () => {
  const [queryClient] = React.useState(() => new QueryClient());
  const [trpcClient] = React.useState(() =>
    trpc.createClient({ url, transformer: superjson }),
  );

  return (
    <trpc.Provider client={trpcClient} queryClient={queryClient}>
      <QueryClientProvider client={queryClient}>
        <SafeAreaProvider>
          <HomeScreen />
          <StatusBar />
        </SafeAreaProvider>
      </QueryClientProvider>
    </trpc.Provider>
  );
};

registerRootComponent(App);import { Text, View } from "react-native";
export const HomeScreen = () => {
return (
<View className="flex flex-1 items-center justify-center bg-white">
<Text className="font-bold text-blue-800">Home Screen</Text>
</View>
);
};If you launch the application at this point, you'll notice there are errors about copy-anything (used by superjson) not being resolved correctly. This is because metro doesn't resolve .cjs files by default, so we'll have to add support for this in order to support superjson transforming. Create a metro.config.js and add the following:
const { getDefaultConfig } = require("expo/metro-config");
const path = require("path");

const projectRoot = __dirname;
const workspaceRoot = path.resolve(projectRoot, "../..");

// Create the default Metro config
const config = getDefaultConfig(projectRoot);

// Add the additional `cjs` extension to the resolver
config.resolver.sourceExts.push("cjs");

// 1. Watch all files within the monorepo
config.watchFolders = [workspaceRoot];
// 2. Let Metro know where to resolve packages and in what order
config.resolver.nodeModulesPaths = [
  path.resolve(projectRoot, "node_modules"),
  path.resolve(workspaceRoot, "node_modules"),
];
// 3. Force Metro to resolve (sub)dependencies only from the `nodeModulesPaths`
config.resolver.disableHierarchicalLookup = true;

module.exports = config;
Your tRPC API is now setup and ready to be consumed. Before that, lets modify the router so we have something to display.
At this point, your repo should look something like this.
Making something pseudo-useful
You can most likely skip this step, in that case you can skip to the final words. Below I'll just show a mockup usage of how this all works together!
I'll make a blog-ish example here. Since this is highly personal, I'll just go over this briefly. I'll first modify my prisma model to include some basic data for a post:
model Post {
    id      String @id @default(cuid())
    title   String
    content String
}
Next, I'll fetch this data in a tRPC postRouter:
export const postRouter = t.router({
  all: publicProcedure.query(async ({ ctx }) => {
    return await ctx.prisma.post.findMany();
  }),
  byId: publicProcedure.input(z.string()).query(async ({ ctx, input }) => {
    return await ctx.prisma.post.findFirst({ where: { id: input } });
  }),
});
For now, I'll just add a few example posts using Prisma Studio. The resulting repo looks something like this, and we can now consume this on both the Next.js and Expo applications.
If you want to share components and navigation logic between your applications, check out Solito. I however, believe these platforms are different enough that they should be treated differently, so I'll satisfy with just sharing my API logic, and write separate components and screens for each platform.
I'll create a PostCard in both React as well as React Native:
const PostCard: React.FC<{
  post: RouterOutputs["post"]["all"][number];
}> = ({ post }) => {
  return (
    <div className="p-4">
      <h2 className="text-2xl font-bold text-gray-800">{post.title}</h2>
      <p className="text-gray-600">{post.content}</p>
    </div>
  );
};const PostCard: React.FC<{
post: RouterOutputs["post"]["all"][number];
}> = ({ post }) => {
return (
<View className="p-4">
<Text className="text-2xl font-bold text-gray-800">{post.title}</Text>
<Text className="text-gray-600">{post.content}</Text>
</View>
);
};Next, we'll fetch the posts from our API and display them using these cards:
const Home: NextPage = () => {
  const postQuery = trpc.post.all.useQuery();

  return (
    ...
    <div className="flex items-center justify-center w-full pt-6 text-2xl text-blue-500">
      {postQuery.data ? (
        <div className="flex flex-col gap-4">
          {postQuery.data?.map((p) => {
            return <PostCard post={p} />;
          })}
        </div>
      ) : (
        <p>Loading..</p>
      )}
    </div>
  );
};export const HomeScreen = () => {
const postQuery = trpc.post.all.useQuery();
return (
<SafeAreaView>
<View className="h-full w-full">
<FlashList
data={postQuery.data}
estimatedItemSize={20}
renderItem={(p) => <PostCard post={p.item} />}
/>
</View>
</SafeAreaView>
);
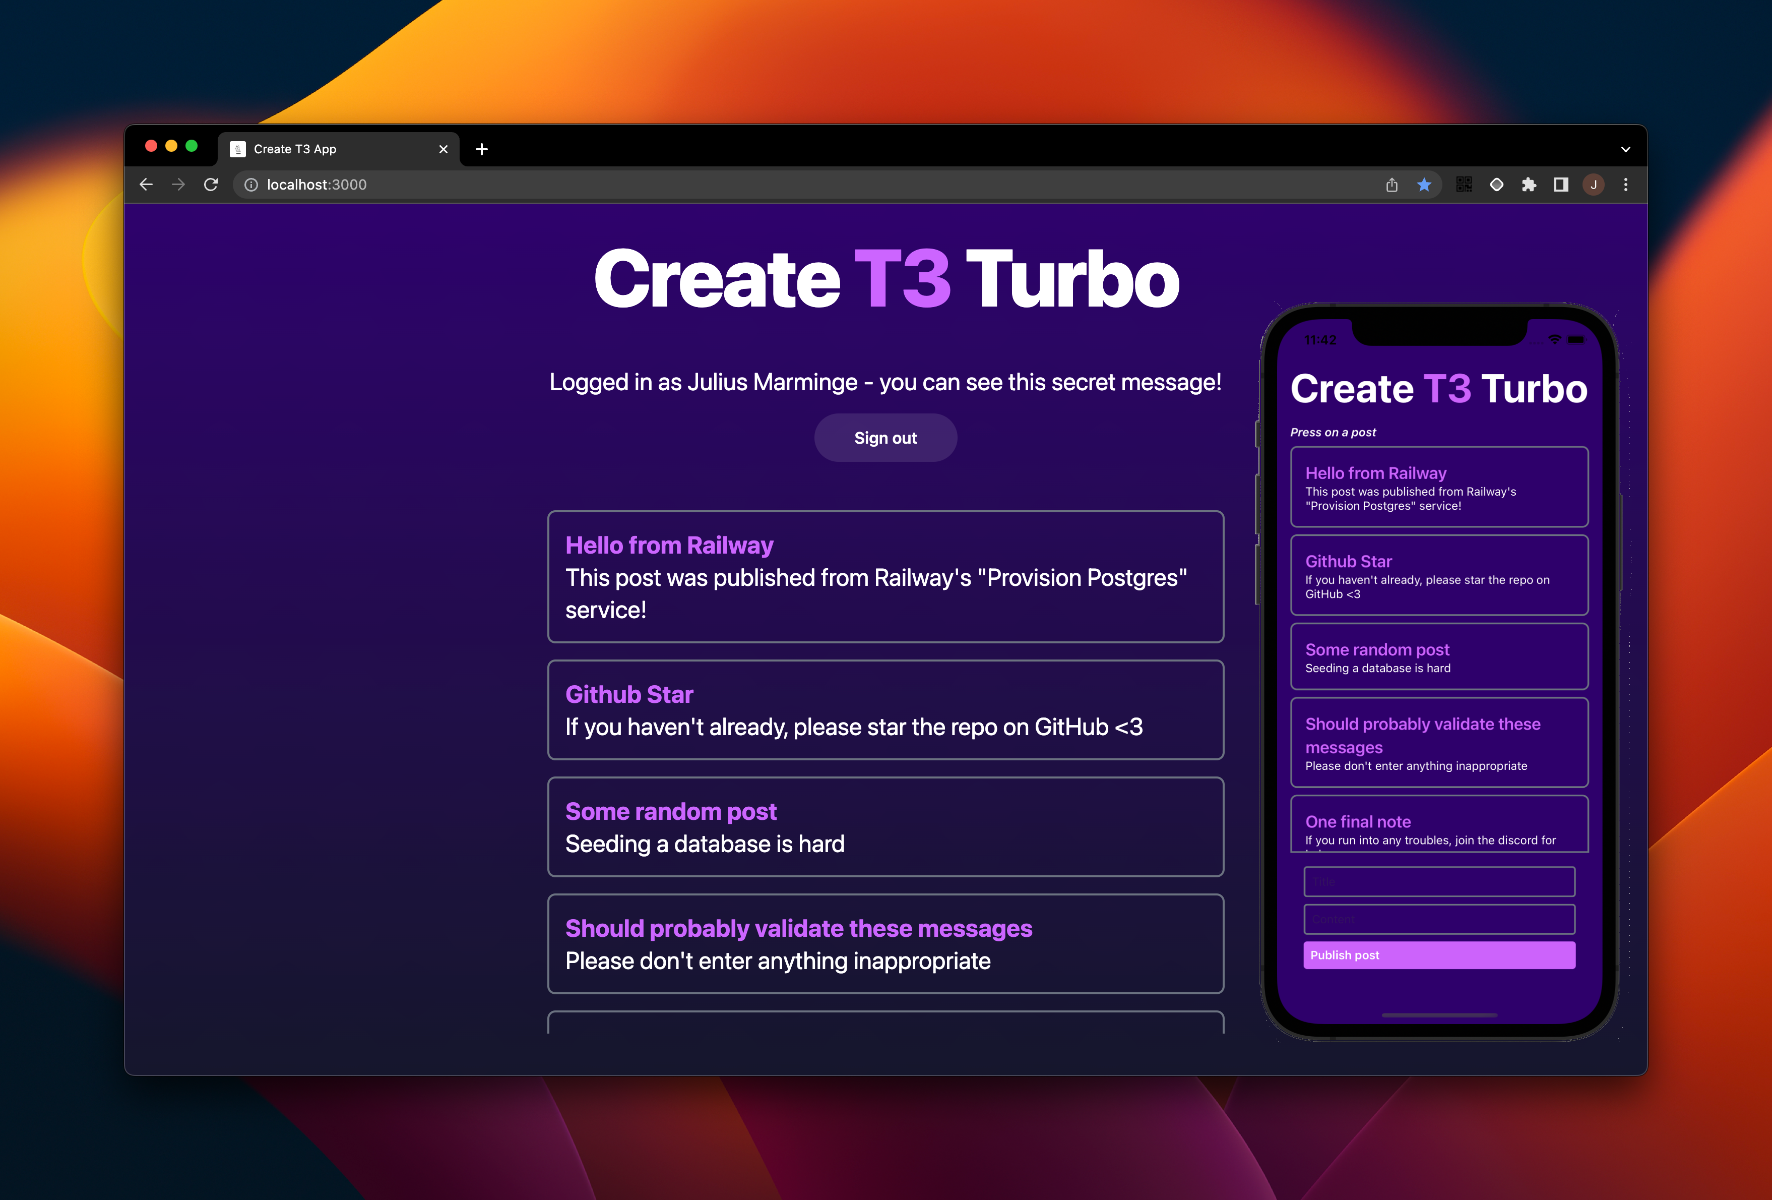
};And we're done! You should see your posts appearing on both applications, and if you add another one in the Prisma Studio, it will appear just like the others! Here is a screenshot of the final result:
Final Words
Thank you for reading this post. This was my first ever post, so if you enjoyed it, go give the repo a star. If it helped you out, consider buying me a coffee, I would truly appreciate it!
Also, this blog is not finished yet, but I wanted to get this post up as soon as possible to satisfy the community demands. If you have any suggestions for how to improve it, feel free to get in touch!